Docker is an open platform for developers and sysadmins to build, ship and run distributed applications.
- Docker Engine: a portable, lightwaight runtime and packaging tool
- Docker Hub: a cloud service for sharing applications and automating workflows.
Docker features
- Enables apps to be quickly assembled from components
- Eliminates the friction between Dev, QA, and production environments
- It should be able to ship faster
- Should be able to run the same app unchanged, on laptops, data center VMs, and cloud.
- Docker uses LXC (Linux Containers) for operating system-level virtualization.
How to use Docker
- Using boot2docker
- Using Vagrant with Linux
- Using Cloud
- Amazon AWS ECS
- Google Container Engine
Boot docker using vagrant
- Spin up a new vagrant box:
vagrant init ubuntu/trusty64
vagrant up
vagrant ssh
- Install Docker
sudo apt-get install docker.io
- Use docker run to start a container and execute a command.
- This command runs a container using CentosOS7
- If the image is not available, it will be downloaded automatically
- Once the container is started, the command
/bin/echo 'Hello world'gets executed and the container stops.
sudo docker run centos:7 /bin/echo 'Hello world'
- To lanch an interactive container, the following command can be executed:
-iruns the contatiner in interactive mode/bin/bashstarts the bash shell- The container will run untill we exit bash
sudo docker run -it ubuntu:14.04 /bin/bash
- We can serve a web page from inside a container
-pmaps the port from the container at port 80 to 8080 on the host machine
sudo docker run -p 127.0.0.1:8080:80 -i ubuntu:14.04 nc -kl 80
- Docker can build images automatically by reading the instructions from a Dockerfile
- A Dockerfile is a text document that contains all the commands a user could call on the command line to assemble an image.
- Using docker build users can create an automated build that executes several command-line instuctions in succession.
Docker Demo
Let’s run a simple nodeJS project in docker
- Create a new directory called docker-demo and save the following files:
index.js
//index.js

var express = require('express');
var app = express();

app.get('/', function (req, res) {
  res.send('Hello World!');
});

var server = app.listen(3000, function () {
  var host = server.address().address;
  var port = server.address().port;

  console.log('Example app listening at http://%s:%s', host, port);
});
package.json
{
  "name": "myapp",
  "version": "0.0.1",
  "private": true,
  "scripts": {
    "start": "node index.js"
  },
  "engines": {
    "node": "^4.6.1"
  },
  "dependencies": {
    "express": "^4.14.0",
    "mysql": "^2.10.2"
  }
}
Dockerfile
#Dockerfile
FROM node:4.6
WORKDIR /app
ADD . /app
RUN npm install
EXPOSE 3000
CMD npm start
- Now we need to build our Dockerfile
cd docker-demo
docker build .
#we have hash key 7ae8aef582cc
docker run -p8080:3000 -t 7ae8aef582cc
Now you can access you browser to port 8080. It works, but its not very convenient to build images this way. Better would be to use a contatiner orchestrator to manage containers for us.
Docker architecture
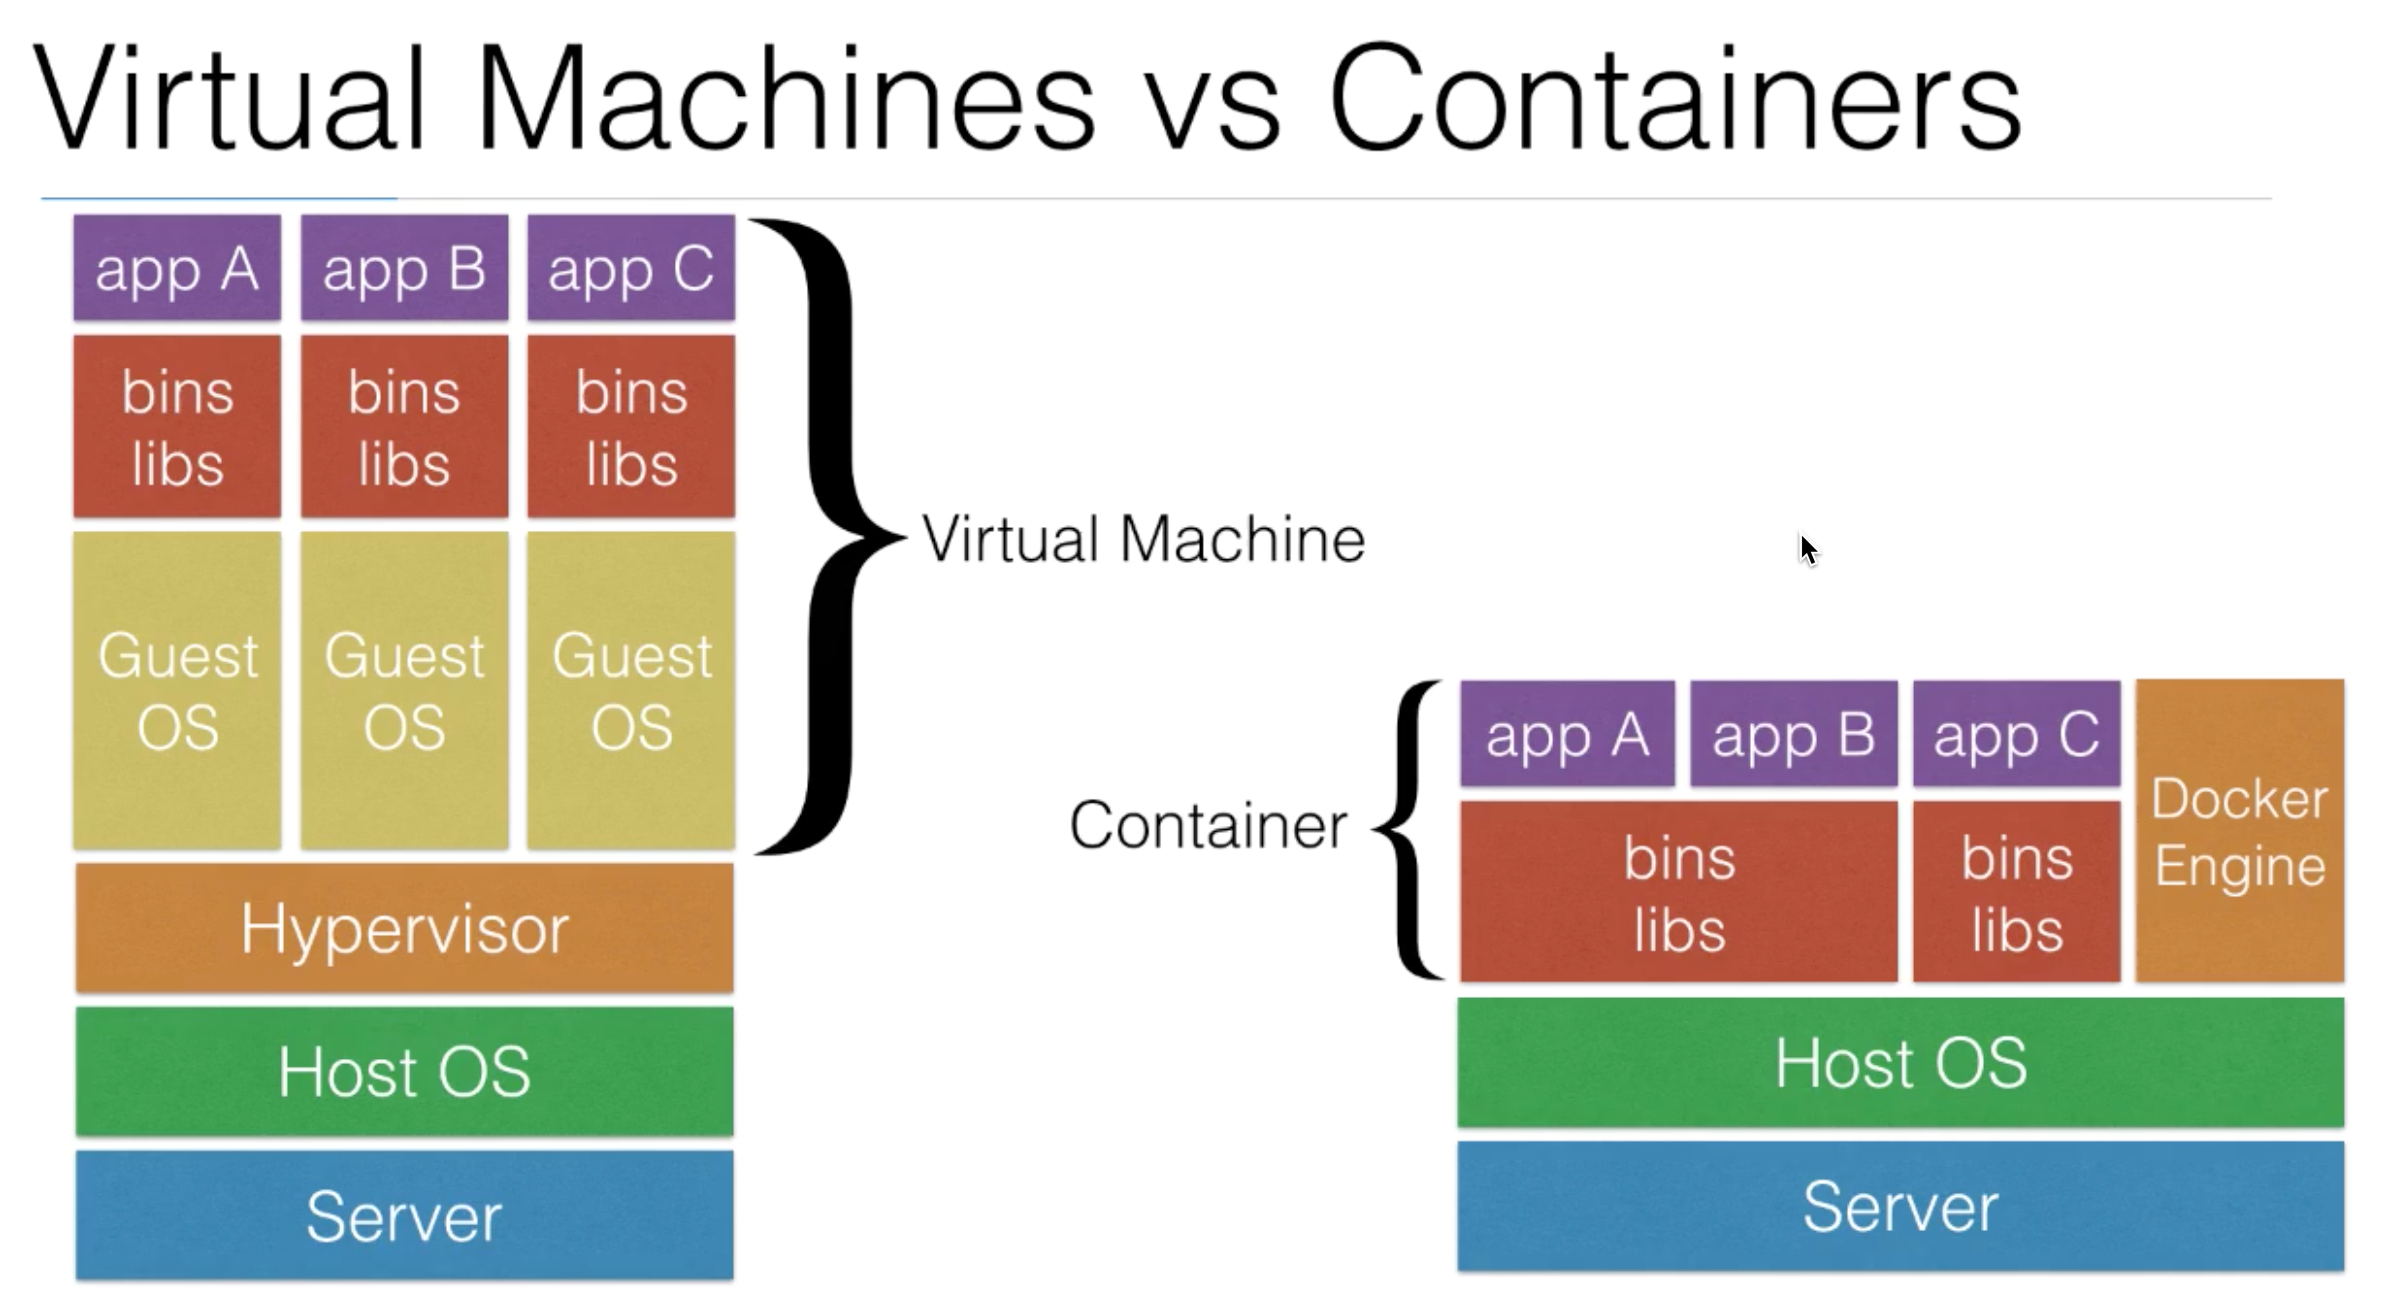
- Docker (written in the programming language Go) uses functionality in the Host OS to achieve isolation.
- Host OS:
- Namespaces: Every container has its own pid, net, ipc, mnt, uts namespace.
- Control Groups: limitation and prioritization of resources like CPU, Memory, I/O, network, etc.
Docker Images and Layers
- Docker images are the basis for container, for example the ubuntu image.
- Each Docker image references a list of read-only layers
- These layers are stacked together
- Layers can potentially be shared between images
- The docker storage driver makes the container see these layers as one single image (a single unified view)
- When you create a new container from an image, a “Thin Read/Write” layer gets added, often called the Container Layer
- The Read/Write layer is writable by container (or the user using the container)
- The image Layers are read only
- Every contatiner has its own Container Layer
- Containers can share the readonly image layers and write in their own writable container layer (which is not shared)
- When a container is stopped, all changes made in the Container Layer are lost.
- The underlying image layers remain intact when stopping a container
- After modifying a container, you can use docker commit to add the newly created “Thin R/W Layer” to the image.
- Each layers have a secure content hash, avoids ID collisions, guarantees data integrity, better sharing of layers between images.
- In practice you should see better reuse of layers, even if the images didn’t come from the same build.
- Using the
Copy on Write Strategy, processes will share the data as long as both processes have the same data. As soon as one process changes the data, the data will be copied first, then changed. - Both images as containers use the copy on write strategy to optimize disk space and the performance of a container start.
- Multiple containers can safely share the underlying image.
- When an existing file in the container is modified, a copy on write operation will be performed: the file will be copied “up” from one of the layers to the
Thin R/W layerand will then be modified.
Docker Volumes
- A volume is a special directory in the container that bypasses the Container Layer (Thin Read/Write Layer) and the read only image layers.
- Volumes are initializes when the container starts
- Data Volumes can be shared by containers
- Changes to the data on the volume will go directly to the host system and will not be saved in the image layers.
- When a container is removed, the data on the Docker Volume remains. It has been written to the Host Operating System (Volume = persistent data store)
- To create a data volume, you create a mapping between a container directory and a directory on the host system:
- The following command launches a Ubuntu LTS container and mounts
/data/webappfrom the Host OS into the container as/webapp
- The following command launches a Ubuntu LTS container and mounts
sudo docker run --name example -v /data/webapp:/webapp --t -i ubuntu:14.04 /bin/bash
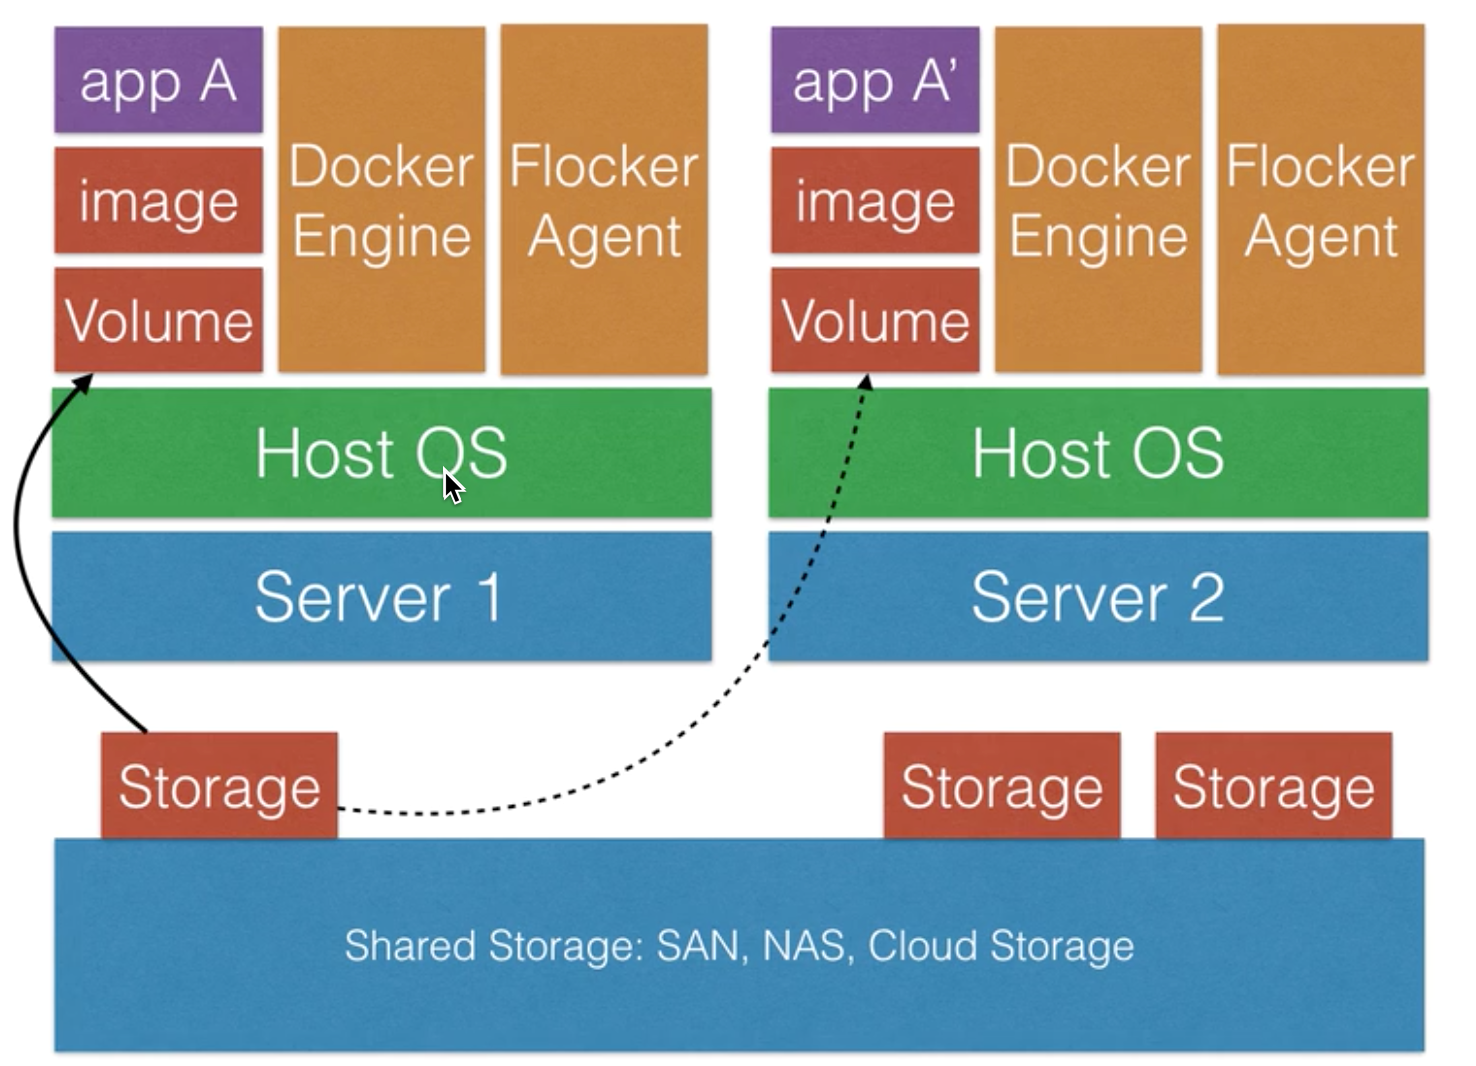
- Containers can be started on other physical hosts, but how to transfer data on different Host?
Docker Volume Pluginsenable you to integrate Dcoker Engine with external storage systems. - Depending on the storage you will use, the underlying data can be transferred to where to container gets started, independent from the physical host the container is running on.
- Check
Flocker
Docker Networking
- New Docker containers connect to a bridged network by default (difficult to maintain)
- Create user defined networks is better way:
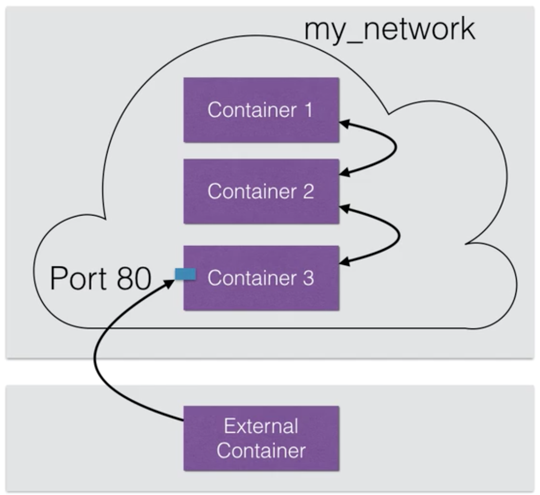
- Containers within the same user defined network can communicate with each other, but cannot communicate with outside containers.
- User defined Bridge Network (on a signle Host OS)
- Overlay Network (Multi-Host OS)
- Bridge network
docker network create --driver bridge my_network
docker run --net=my_network -itd --name=container1 ubuntu:14.04
docker run --net=my_network -itd --name=container2 ubuntu:14.04
docker run --net=my_network -itd -p 80:80 --name=container3 ubuntu:14.04
- Overlay network
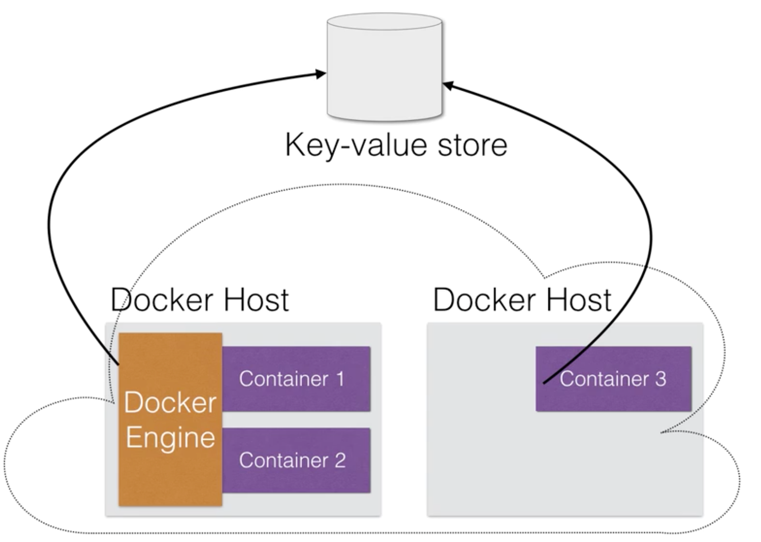
- Docker’s overlay network supports multi-hosts networking
- A key-value store is needed to store the configuration in
- Currently Consul, etcd, and Zookeeper are supported
- You can start your key-value store on 1 node, but eventually 3 or 5 nodes are recommended.
docker network create --driver overlay my_overlay_network
docker run --net=my_overlay_network -itd --name=container1 ubuntu:14.04
Docker Hub
- Docker Hub is a service that provides public and private registries for your Docker Images
- Alternatives are available, e.g. AWS Docker Registry or self-hosted

Docker Compose
- Compose is a tool part of Docker to define your multi-container docker environment as code.
- Compose can manage the lifecycle of your docker containers
- Typically your write a Dockerfile for every container you want to launch
- You launch and administrate the containers with the docker-compose command
- Docker compose is greate if you have a multi-container setup
- It can be used during developemnt, testing, or staging environments
-
In your Continuous Integration process, it can be used to test an application that depends on external services. The external service can be launched with docker-compose in a container.
- Now we want to use database for last nodejs example:
docker-compose.yml
- This docker-compose launches 2 containers:
web&db webis defined on the first line and builds the Dockerfile based in the current pathdbis an image pulled from Docker Hub- Environment variables are passed to the app
- Mysql image will create a database and add a user after docker has spun up the image
- The host, database, user and password are passed to the
web
web:
  build: .
  command: node index-db.js
  ports:
    - "3000:3000"
  links:
    - db
  environment:
    MYSQL_DATABASE: myapp
    MYSQL_USER: myapp
    MYSQL_PASSWORD: mysecurepass
    MYSQL_HOST: db
db:
  image: orchardup/mysql
  ports:
    - "3306:3306"
  environment:
    MYSQL_DATABASE: myapp
    MYSQL_USER: myapp
    MYSQL_PASSWORD: mysecurepass
index.js
var express = require('express');
var app = express();
var mysql = require("mysql");
var con = mysql.createConnection({ host: process.env.MYSQL_HOST, user: process.env.MYSQL_USER, password: process.env.MYSQL_PASSWORD, database: process.env.MYSQL_DATABASE});

// mysql code

con.connect(function(err){
  if(err){
    console.log('Error connecting to db: ', err);
    return;
  }
  console.log('Connection to db established');
  con.query('CREATE TABLE IF NOT EXISTS visits (id INT NOT NULL PRIMARY KEY AUTO_INCREMENT, ts BIGINT)',function(err) {
    if(err) throw err;
  });
});

// Request handling
app.get('/', function (req, res) {
  // create table if not exist
  con.query('INSERT INTO visits (ts) values (?)', Date.now(),function(err, dbRes) {
    if(err) throw err;
    res.send('Hello World! You are visitor number '+dbRes.insertId);
  });
});


// server
var server = app.listen(3000, function () {
  var host = server.address().address;
  var port = server.address().port;

  console.log('Example app listening at http://%s:%s', host, port);
});
docker-compose build && docker-compose up db
docker-compose up -d app
docker-compose up -d web
docker ps
docker-compose down
Docker Machine
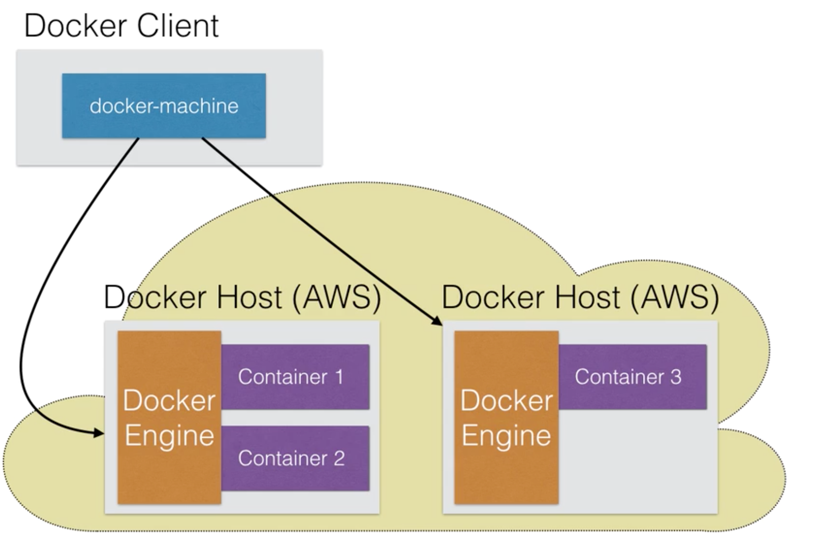
- Docker Machine enables you to provision the Docker Engine on virtual hosts
- Once provisioned, you can use Docker Machine to mange those hosts (for example to upgrade the Docker client and damon)
- You can use Docker Machine to provision Docker hosts on remote systems (on cloud, for example on Amazon AWS)
- You can also use Docker Machine to provision Docker using VirtualBox on your physical Win/Mac destop/laptop
- If you are interested in using Docker Machine to run Docker straight from Mac or Windows, without Vagrant in the middle, then take a look at Docker Toolbox:
- Docker Toolbox comes with Docker, Compose and Machine
- Also includes Kinematic: a graphical user interface to manage your containers
